

After you've purchased your DayBetter led strip lights and picked out the strip lights you want, then let' s start to install the strip lights next.
Now, let's get started, with just a few simple steps, you can create your own vibe!
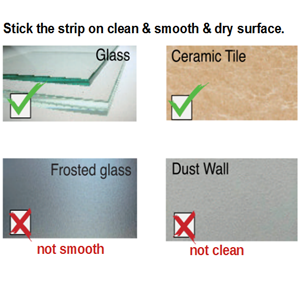
- Pre-work
Because most of the lights on the market are in the form of adhesive paste, so it is important to clean up the adhesive surface in advance, try to keep the surface clean, dry and smooth, in order to make the lights stick more firmly and more sustainable.
- INSTALLATION
Step 1: Insert the 4-pin end of the strip into the 4-pin socket of the controller. Note that the arrow mark should align the 12V mark. If wrong direction, the strip would not light up.
Step 2: Connect the controller to the power adapter.
Step 3: Plug into power socket to get power supply.
Then when the lights are up, do a little test to check if there are any problems with the strip lights.


- DIY
After test, you can exert your imagination, creativity and cut the light strip to meet your needs for different sizes.
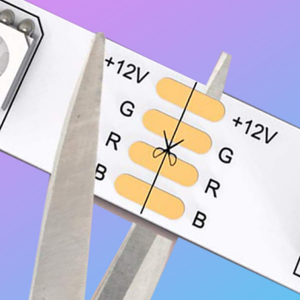
Be careful to cut at the place marked with scissors, otherwise it will sever the wiring inside and cause you lose a light, follow the instructions for proper cutting, and subsequently just use a 4-pin led strip connector to perfectly reconnect the two cut strip lights together, which certainly will be more of challenge to your hands-on ability. After the connection, you will also need to test it to make sure it works well.
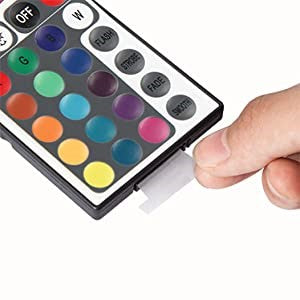
BTW, notice that: Before using the remote control, please pull out the transparent insulation sheet inside the remote control, or the remote control can not be used normally!
Now you can create your own vibe with your strip lights!
Hope this article can help you, if you still need some help for using DayBetter products, you can contact us, we will have a professional customer service team to answer your questions!


